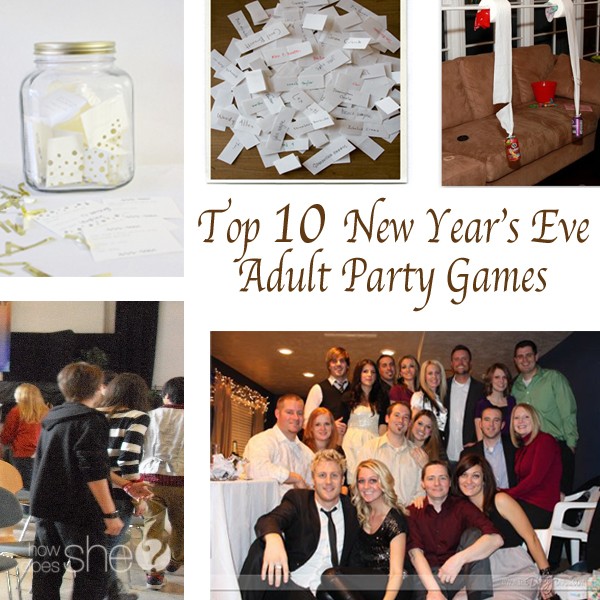
New Year’s Eve is the perfect time to play some fun games together. Here are 15 fun ideas for activities to play with your friends and family! These New Year’s Eve activities are great for kids or adults. 15 fun New Year’s Eve Activities for Kids or Adults
1. Guessing the ResolutionsMake each of your guests write down resolutions, each on its own slip of paper. Pull one slip of paper out of a basket at a time and read it out loud. Everyone has to write down who they think made each resolution. At the end of the readings, the person who guessed the most correctly wins a prize. Read some of the wrong guesses out loud for fun! 2. 2 Resolutions and One LieHave everyone tell the group 2 of their real resolutions and 1 fake resolution. Everyone has to guess which is the fake resolution. 3. New Year’s Eve ScrambleWrite a bunch of different words on a piece of paper that have to do with New Year’s Eve and scramble the letters. The person who guesses the most words correctly wins a prize. 4. Word GuessingWrite down 100 words on index cards such as stare, grin, blink, giggle, laugh, plate, shoelace, thread or any word you like. Stack the cards and put them in the center of the room. Divide the players into 2 teams and seat them opposite each other. Set the timer or stopwatch for one minute. Have the first player from Team One draw a card from the pile and give clues to the word to his/her teammates before the timer ends the play. 5. Fun PhotosTake the picture of each of your guests with the digital camera. Have them make a funny face and be sure to tell them there is a prize for the best face. After all the pictures have been taken, download them to your computer or laptop and ask everyone to gather around the monitor. The winner will be judged on the greatest laughter. 6. Celebrity HuntEveryone writes the name of a celebrity, famous person or character on a piece of paper and then they stick to the forehead of the player on their left (use tape or office Post-It notes). Make sure they don’t see the name. Now the game starts. Everyone else can see your forehead. The objective is to work out who you are. Going around the table, each payer takes a turn to ask the party questions about who they are – answers can be YES or NO only. If you get a YES you may continue asking, if you get a NO play moves on to the left. Last person to guess their name is the loser. 7. Naming of CandyFor this, you need about 6 different candies that have given names like M&M’s, Crunch, Wrigley’s, etc. 1 Die (or 2 dice if the crowd is very large). Everyone is seated on the floor in a circle. Packaged candy bars or candy are placed in the middle of the circle. The game starts with everyone saying their own name. If you already know each other, make up an animal name or famous person name or something to make it harder. The leader then makes sure that everyone knows what candy is in the middle. Someone begins by rolling the dice. If they roll a 6, they can take one of the candies in the middle. The die continues to go quickly around the circle while people keep picking up candy. When all of the candies are taken, people can then get other people’s candy. In order to get their candy, they must state the person’s first name and the name of the candy they hold. The person who rolls a 6 and matches the name of the candy and the person takes the other’s candy. If they forget either name, they miss their turn and the dice go to the next person and they continue to roll. (One person can get more than one candy and people can hide the candy behind their back). This is a great way of getting to know people’s name and how to get your favorite candies! 8. Have a huge indoor treasure hunt with cluesThe kids will have a blast following the clues to get their treasure. If it is warm where you live, send them outside for parts of it. 9. Create your own time capsulePut anything you want to remember along with your resolutions in a container and then hide it till next year. 10. Necklaces made of yarnThe players try to win as many yarn necklaces as they can. He/she who has the most at the end wins a prize. Give each player a necklace. The idea is to get the other players to say “No”. Try to make your friends say, “No”. If your friend says it, then you get their necklace. This game is played during the entire party. 11. Word gameWhoever creates the most words out of the letters in Happy New Year, wins! 12. Guess how many objects in a jarFill a clear glass or plastic jar (with a secure lid) with a known quantity (yes, you have to count them!) of candy, marbles, pennies, tiny toy cars or some other item that ties in with the theme of your party. Decorate the jar and lid with stickers and a bow and place on the arrival activity table. Provide slips of paper for guests to write their names and their “guess” and a small basket or box to collect the entries. At the end of the party award the jar of goodies to the child with the closest guess. 13. Scavenger huntSome ideas: a party hat, streamers, noisemakers, plastic champagne glass, a clock, Happy New Year card, Happy New Year balloon, drink stirrers, coasters, chocolate coins, a calendar, or silver bells to ring in the New Year. 14. Match the country with how they say, “Happy New Year”.A free printable game from HowDoesShe – This is suited more for older kids or adults. 15. More printable gamesParty Supply Hut has more fun printable games for your New Year’s Eve activities. Some ideas were taken from The Holiday Spot What are your favorite New Year’s Eve games and activities?Make your new year’s eve celebration extra special with some DIY decorations – there are such great ideas here: Will you be celebrating with little ones? You’ll love our 18 fun ideas to ring in the new year with your kids: Or maybe you’re putting the kids to bed and celebrating with the other grown-ups in your life. We’ve got ideas for that, too! //
0 Comments
Valentine’s Day…the one holiday we owe to great loves everywhere to celebrate, but don’t always know what to do. How about any of these 16 free things to do on Valentine’s Day that are way more memorable than dinner and a movie?! 16 Free Things To Do on Valentine’s Day1. Borrow some snowshoes.Call up your outdoorsy friend and borrow her snowshoes for the day. Take your partner, your bestie, or your kiddos out for a brisk and refreshing tromp through nature. 2. Cook up a pantry surprise!Instead of making a fancy dinner this Valentine’s Day, summon up your creative culinary skills instead. Peruse the pantry and fridge for ingredients you can each turn into something edible…I mean delicious! 3. Make your own signature drinks.Call it a Flaming Lips or the Twisted Tie but spend a cozy night indoors coming up with your very own signature drinks. As a fun name generator, write down a list of adjectives in one column, a list of interesting nouns in another and have fun combining them. 4. Park the car and…star gaze.Take a drive to your special spot, pack a picnic basket of junk food and a little bubbly, and gaze at the stars. Do your research ahead of time and print out a map of the constellations to search for. 5. Follow a YouTube dance tutorial.What better time to let loose and learn the latest dance moves than in the comfort (and privacy) of your own home. Get your smart TV tuned to YouTube, search for your favorite dance tutorial, and practice until you can put on a stunning performance your kids will be sure to be mortified of. 6. Bundle up and go sledding.If Valentine’s Day is notoriously cold where you live, embrace the chill and head to the nearest sledding hill. You’ll have a blast and then the best part is coming home to hot chocolate by the fire. 7. Play Valentine’s poker.You know the game, now play it Valentine’s style with these heart-shaped playing cards and your favorite Valentine’s candies in place of money or chips. If it’s just you and your boo, you might want to play for clothing ;). 8. Cozy at-home karaoke.Again, inside the locked doors of your home is the best place to display your stellar karaoke skills that should probably remain a secret. There are some really fun karaoke apps you can download right to your smart device like Soulo Karaoke (free) and StarMaker: Karaoke + auto tune (also free). 9. Test drive your dream car.Here’s a fun indulgence that would make a great Valentine’s date: head to the dealership and test drive your dream cars. Act like you’re living large for the day. 10. Bake up some Valentine’s goodies and deliver them.One thing we love to do on Valentine’s is to bake some yummy goodies. We just don’t want to get stuck eating them all! So this V-Day, share the sweetness and take your favorite yummies to friends and family! 11. Organize a progressive dinner party.Plan an entire day of fun with a progressive Valentine’s dinner that takes you from one house to the next for heart-shaped appetizers, festive entrees, and a lovely dessert. 12. Find a great bike trail.If you are looking for more physical things to do on Valentine’s Day, this is a great one to work off all of those Valentine’s calories. Throw the bikes in the back of the truck and take in some of your local bike trails. 13. Have a beach treasure hunt.If you’re lucky enough to live by a beach or lake, plan a special Valentine’s treasure hunt for your honey or family with a treasure box filled with little Valentine’s gifts. 14. Have an indoor photo shoot.Every summer when we go on a family theme-park vacation, it’s my secret wish to be in one of those Wild West-themed photographs. This Valentine’s Day, do a photo shoot at home with props from around the house. 15. Cake wars Valentine’s style.Looking for a challenging yet highly entertaining Valentine’s date idea? Try your hand at a little cake war. Consult the Food Network, a cake decorating blog, or YouTube and spend a few hours making the most amazing cake of your life! 16. Snowman or sand castle contest.Whether you’ve got snow or sand, both natural elements make for a fun and free Valentine’s activity. Make a snowman or sand castle with your love and then stand back to marvel at your creation. What are your favorite things to do on Valentine’s Day? Feel free to share with us in the comments!Looking for more great Valentine’s Ideas? You’ll love a few of these below! The post 16 Free Things To Do on Valentine’s Day appeared first on How Does She. by Nicolette via Home And Garden via Blogger 16 Free Things To Do on Valentine’s Day Aren’t we all searching for little ways to add a personal touch to our home? I know I am always wanting to add a little something here or there. If I could choose my #1 favorite way to spice up a room it would be in the form of pillows! They are so easy to sew, change and customize. They can add lots of color and fill in empty spaces! I have been dying to try out a monogrammed pillow cover for a while now. I see them occasionally in the store but can never find the letter or font I want! So why not make it yourself and make it 100% custom! Add a Personal Touch to Any Room with a Monogrammed Pillow CoverPillow covers are really simple to make once you understand the process. This no zipper case is perfect for a quick and easy sewing project. Supplies:A Pillow Instructions for the Monogram Image for Your Pillow CoverFirst, you will want to cut out the front and back pieces for your pillow cover. FOR THE FRONT: Measure your pillow and cut your fabric the height +1″ and the width +1″. To make a 22-inch pillow, I cut the front to be 23″ x 23″. FOR THE BACK: You are going to cut two pieces. Divide the width of your pillow in half + 4 inches. Cut 2 pieces to be the height + 1″ and the width divided by 2 + 4 inches. Does that make sense? So for a 22 inch pillow here is the math: 22/2= 11 + 4 = 15. So I cut the two back pieces at 23″ x 15″. These will overlap and create an opening for the pillow to be inserted. After you have the front and backs cut out you move on to the fun part. It is best to use a thicker fabric for this part. I love the way felted wool looks or even just plain felt. I chose to use some extra duck cloth I already had lying around. Decide on what you would like to have on the front of your pillow. I love a simple monogram pillow cover, they are totally adorable. If you wanted to go a different direction it would be simple to do an animal silhouette (I want to do a bird), a shape like a heart, headphones, or a star. I can think of so many, the options are limitless! I love to search through clip art on google images for cute ideas. Or if you are really great at free handing you don’t even need an image to copy! Print out an image or freehand an outline, pin it to your contrasting fabric and cut away! Assembling Your Monogrammed Pillow CoverNow you’re ready to start on the pillow cover itself. Take the two back pieces over to your ironing board. Press under 1/4 inch twice on one long side of each back piece. This will give you an easy clean finish to sew. Stitch close to the folded edge of the clean finish and press it smooth. This will make up the overlapping back of the pillow. Next take your cute cut out for the front of the pillow. Decide on where you want to place it. Be creative! Things don’t always have to go right in the center or be perfectly aligned. Have some fun! Once you have the placement you want, pin it to the front pillow piece. Don’t pin it too close to the edges. Leave a 1/2″ border for the pillow seam. There are so many options for attaching this decorative piece to your pillow cover. If you know how to and like hand stitching, it would look darling around the edge. I just used a simple sewing machine stitch and sewed about 1/8″ from the edges of the letter. My suggestion is to take it slow and watch closely as you go. Final Steps for Your Monogrammed Pillow CoverNow to make the pillow cover! Take the front of the pillow and lay it face up. Place the two back pieces overlapping on top and pin all the edges to match. *Don’t mind the fact that my overlap is actually on the side, I ran out of fabric and had to improvise. I really prefer the overlap in the middle of the pillow. Sew around the edge of the pillow with a 1/2 ” seam allowance. Backstitch at the beginning and end. After you’ve sewn the pieces together you can go back around with a zigzag stitch to secure the edges. Sew the zigzag stitch in the seam allowance close to the original seam. This is just for extra stability, and it not necessary if you are in a hurry. Trim the 4 corners of the pillow. Flip the pillowcase right side out and push the corners out to a point. Press the seam out on the edges of the pillow, like so: Then stuff the pillow inside the overlapping back pieces of your monogrammed pillow cover and move it around till the cover fits! Fluff it and toss it where you want! Makes a Great Gift for Many Different OccasionsThis monogrammed pillow cover would make a great baby gift, wedding gift with initials, or a cute throw pillow for your family room. You can make cute pillows for each child’s bed. You could even spell out a full word if you have the time and patience ? The possibilities are endless! It adds a personalized touch to any room. I needed a nice big pillow for the rocking chair in my nursery. Have fun sewing! The post Simple Monogrammed Pillow to Add a Personal Touch to Any Room appeared first on How Does She. by Lara via Home And Garden via Blogger Simple Monogrammed Pillow to Add a Personal Touch to Any Room *We’re partnering with Avery to let you know about the adorable My Recipe Binders you can make to preserve your family’s favorite recipes. Organize Your Recipes with This Adorable DIY Recipe BinderI come from a long line of great home cooks. I grew up on Sunday dinners at my Grandma Richard’s house with homemade chicken noodle soup and handmade noodles. Her homestyle mashed potatoes fueled most of my childhood growth and development. And every single birthday, Grandma made sure to make my favorite huckleberry cheesecake. She passed her recipes and her love for cooking to both my mom and myself. My childhood was laced with homemade chocolate chip cookies and delicious hearty meals. Similarly, my Grandma Forbush was known as one of the greatest cooks in our town. Her recipes were always scrawled on notecards (when she used a recipe at all) and she was known for her fabulous homemade bread. She’d make 12 loaves at a time for her seven children and the gaggle of neighbor kids who were always hanging around. Not only was my Grandma Forbush a great home cook, but she was the head cook at my elementary school lunchroom. My grandma and her sister mixed rolls from scratch for 300 kids, made their own apple crisp, and mixed a lot of love into each day’s school lunch. When I’d come through the line, she’d always gave me an extra breadstick or cupcake and a wink. I was her special girl. Everyone loved my grandma for her kindness and her cooking. Family Recipes Tell a StoryFamily recipes are woven into our unique DNA. They tell a story of where we come from and who we are. My Grandma Forbush passed away a few years ago and as I was flipping through my recipes the other day, a tiny faded card fell out. It was my grandma’s bread recipe. Tears trickled down my face as I read these uncharacteristic directions:
Family recipes are too important to forget or worse, lose. They are like treasures to me, so I decided to put my favorite and most beloved recipes all in one special recipe binder. The Avery My Recipe BinderAvery has a My Recipe Binder that is perfect for organizing your recipes. It would also make an excellent DIY gift for moms, grandmas, sisters, daughters, or granddaughters. I remember going off to college for the first time and whenever I got a little homesick, I’d pull out my family’s recipe book and make a batch of my mom’s cinnamon rolls. It always made home feel a lot closer. Check out this cute video to see how the Avery My Recipe Binder works. You can get the My Recipe Binder and starter kit on Amazon for 25% off with the code 25RECIPE. Follow these steps:
Assembling Your My Recipe BinderAlong with the My Recipe Binder, it’s also helpful to purchase the Avery My Recipe Binder Starter Kit. The starter kit contains 23 various sheet protectors and pocket providers to help keep your recipes safe. The My Recipe Starter Kit sheet protectors are super handy for inserting the free printable templates at Avery.com/recipes. Hop over there where you can access and customize binder covers, tables of contents, and recipe pages. You can also type out some of your hard-to-read recipes at Avery.com/recipes, print them out on their cute custom templates, and insert them into the sheet protectors included in the My Recipe Starter Kit. Now you’re ready to assemble your recipe binder! Step 1: Gather all of your favorite recipes. Step 2: Once you’ve purchased your favorite My Recipe Binder, head to Avery.com/recipe to print out the free templates that go with it. Last Step: Insert all of your recipes and customized pages into the My Recipe Starter Kit sheet protectors and organize them by your preferred categories. Avery Recipe Binders are easy to customize and Avery.com/recipes has free coordinating templates for binder cover sheets, spine labels, dividers and tabs, recipe cards, full recipe pages, and more. You can seriously deck out your recipe book if you so desire!
Preserve your family’s priceless memories because someday, they’ll be a legacy that lives on through generations. I miss my grandma so much, but I can channel her every time I make her recipes. And just in case you’re wondering, I always follow her bread recipe to the tee. I’m afraid of what might happen if I didn’t! Photos by Maggie Grace Photography *Thank you to Avery for sponsoring this post. All opinions and grandma stories are my own. The post Organize Your Recipes with This Adorable DIY Recipe Binder appeared first on How Does She. by Nicolette via Home And Garden via Blogger Organize Your Recipes with This Adorable DIY Recipe Binder 
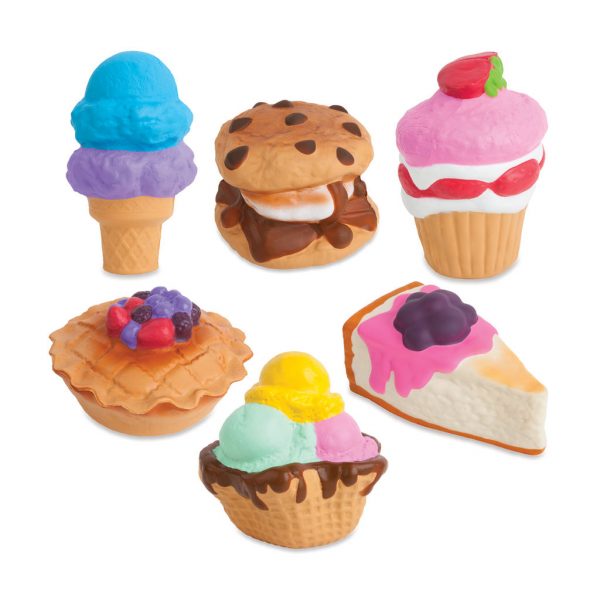
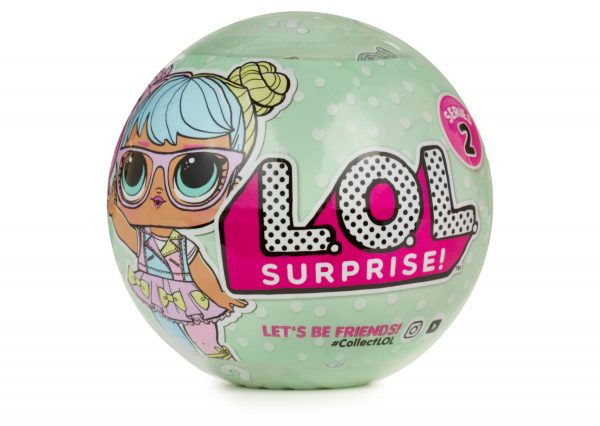
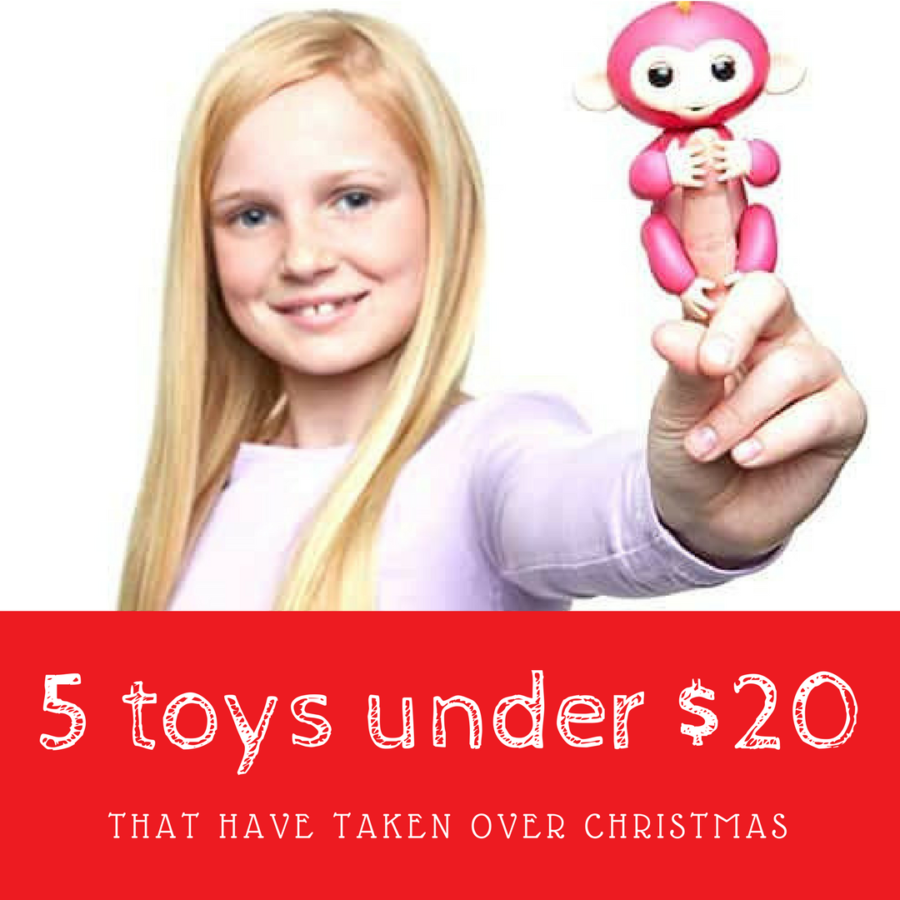
Have you noticed a high demand for certain toys this year? well we have been surveiling the scene and this is what we have found. most stores and online store can not keep these things in-stock. so if they are in stock now GRAB THEM!
Pikmi PopsThey come in different sizes but I’ve noticed the medium and jumbo are the hardest to find. If they are sold out at Target > try amazon. FingerlingsIf you dont live under a rock you probably know about these little guys and how hard it is to get your hands on an actual fingerling. Cyber monday was HUGE on amazon for restocks.. I suspect we will get another big restock before Christmas. Keep your eyes on our facebook page, we will be posting when they are in stock. here are a few links you can check in the mean time.. Amazon . Kohl’s . Target . ( they go for $14.99 so if people are asking for more just know you are being priced gouged. ) SquishiesYou can get all different brands of these but to my knowledge Soft ‘n Slo is the most popular brand. there is not much purpose other than being super squishies and smell good. they could double for your kid as a stress ball. find them at Target. Amazon. and in-store at Walmart. LOL SurpriseI honestly dont know much about these toys other than what my 5 year old daughter has told me about them. I know they are little plastic dolls you can dress, and that they are completely sold out almost everywhere. get them at these places Target, Amazon. (big surpise that is $69 at Target ).
ColleggtiblesThese are this years new spin on Hatchimals and They have made a big impressions on little ones. Mrs Clause knows all of the coolest new toys ? get them > here <
The post 5 toys under $20 that have taken over christmas appeared first on How Does She. by Megan Wood via Home And Garden via Blogger 5 toys under $20 that have taken over christmas When I’m surfing through real estate listings, there’s one kind of house that can always make me stop and click through the photos: a barn conversion. Love ’em! For this one, two old barns in New York were dismantled, moved, and reassembled to create one big house in Roxbury, Connecticut. Take a look! Two Barns Rebuilt Into a House in RoxburyThe listing says:Master Builders Ed Cady Sr and Jr of East Coast Barn Builders have created some of New England’s most iconic residences. This rare opportunity is the personal residence of Cady Jr. East Coast Barn Builders was founded in 1960 by Ed Cady, a carpenter and a contractor.He was one of the first to preserve English and Dutch-style barns, moving and rebuilding them as houses.Love the blue doors and trim on this one.Two antique barns were moved to this site in Roxbury Connecticut from Stone Arabia, New York.“The home has exposed beams, plaster walls, and antique cypress flooring.”This is a major fireplace. This fireplace is not kidding around.“Currently configured as a 2BR + sleeping loft, easily expandable to 4BR.”The rustic kitchen has beamed ceilings:“Gourmet kitchen has pantry, beehive oven, and custom cabinetry.”East Coast Barn Builders was featured in the beautiful book At Home in the American Barn:Just for fun, check out this kitchen from another barn conversion featured in the book (photo credit Geoffrey Gross):Wow. Imagine the holiday dinners you could have around that table!This barn house in Connecticut is more rustic, and the kitchen a bit cozier!It’s set on 7+ acres with incredible views.Sometimes a house will remind me of another one.The shot above reminded me of Bette Davis’s Butternut Farm in New Hampshire, so I had to look it up:Okay, so they’re clearly different. But sorta similar, right? (Take the tour here.) So pretty in the snow:But I digress! This little red shed at the barn house in Connecticut is charming:The dog’s a nice addition to that scene, too.I especially love the setting for this house, don’t you? Visit the listing for more information and East Coast Barn Builders to see more of their work. P.S. Visit my Barn Homes page to see more, like this one built in New Hampshire:*Posts may contain Amazon affiliate links — thanks! The post Two Old Barns Converted Into One Big House in Connecticut appeared first on Hooked on Houses. by hookedonhouses via Home And Garden via Blogger Two Old Barns Converted Into One Big House in Connecticut *We’re excited to be partnering with Kinder Joy, that yummy treat with a surprise toy inside!As a parent, I live for moments where I get to witness pure joy in my kids’ eyes. I see it every time they chase a butterfly; I see it when my son makes a basket during a basketball game and when my daughter makes a jack-in-the-box pop! It’s the little surprises that make life interesting and we are so excited that Kinder—one of the world’s most popular chocolate brands—is finally bringing Kinder Joy to the United States! In fact, we’re partnering with Kinder Joy to tell you all about it. My kids love these fun and delicious egg-shaped treats with a surprise toy inside and yours will too! What is Kinder Joy?Kinder Joy is a treat like no other. It’s a delicious confection on one side and a fun toy surprise on the other. Kinder Joy comes in a plastic egg-shaped packaging with two separate halves. Each half is sealed off and one side contains the most heavenly treat I’ve ever dipped my spoon into. It’s two soft layers of creamy milk-creme flavored and cocoa flavored goodness. My favorite part is the two round chocolate-covered wafer balls filled with sweet cocoa cream. They’re crunchy with a surprise creamy center that is delicious! It should come as no surprise that my kids’ favorite part is the toy inside each Kinder Joy. Every time they open a Kinder Joy, their eyes light up with delight and I love seeing that pure, childlike joy. Available in Time for the Holidays!Who doesn’t love a surprise? My kids love to watch videos of surprise toys being opened up. With Kinder Joy, they get to open the surprise and experience the wonder of what’s inside. And great news! Kinder Joy is now available in the U.S. this November! That means they’ll make the perfect stocking stuffers for your children or grandchildren. Kinder Joy treats are meant for ages 3 and older. Simple Joys Come in Small PackagesSometimes it’s the smallest things in life that can spur joy: a lady bug crawling across your child’s fingertip or seeing a rainbow in the sky. Simple joys come in small packages and seeing the surprise and delight in my children’s eyes when they open and enjoy Kinder Joy makes my mommy heart happy. Experience the joy of Kinder Joy by snagging them up when they hit shelves this holiday season! *Thank you to Kinder for sponsoring this post. We love trying out yummy new treats! The post Welcome to the U.S. Kinder Joy! appeared first on How Does She. by Nicolette via Home And Garden via Blogger Welcome to the U.S. Kinder Joy! Elf on the Shelf in a Jar of Marshmallows Has your Elf on the Shelf arrived yet? Ours has! His name is Gilverd (named by the kids, of course!). Today I’m sharing one of my new Elf on the Shelf ideas that I’m going to do tomorrow. Our elf has been naughty and got into […] The post Elf on the Shelf in a Jar of Marshmallows appeared first on Smart School House. by Kelly via Home And Garden via Blogger Elf on the Shelf in a Jar of Marshmallows Elf on the Shelf with a Magnifying Glass Has your Elf on the Shelf arrived yet? Ours has! His name is Gilverd (snazzy, right?). Today I’m sharing one of my new Elf on the Shelf ideas that I’m going to do tonight. This Elf on the Shelf with a Magnifying glass is always watching! This […] The post Elf on the Shelf with a Magnifying Glass appeared first on Smart School House. by Kelly via Home And Garden via Blogger Elf on the Shelf with a Magnifying Glass This post is sponsored by the maker of OxiClean™ Max Force™ Laundry Stain Remover Spray. As always, all ideas and opinions are entirely my own. The OxiClean™ brand provided free product for this post. The Day My Kid Became “That Kid”You know “that” kid? The one who picks his nose and eats it or runs through the grocery store pulling boxes and bags off the shelf? It’s easy to look at that kid and criticize his parents. How could someone let their child do that? Well, last summer, my kid became “that kid” and I have a whole new appreciation for parents and an entirely new outlook on messy kids. We’ve collaborated with the maker of OxiClean™Max Force™ Laundry Stain Remover Spray to show that the messes are no big deal—it’s those fun family moments that matter most. Watch the video below to see how my little Ezra became “that kid” at my brother’s wedding. Imperfections Are OkaySometimes we stress so much about being perfect. That day at my brother’s wedding, I realized it’s all the imperfections that make life interesting! I had spent weeks picking out the perfect outfits for my four children. And since we’d all be looking great for the wedding, I figured, why not schedule our family photo—the one that will be going on our Christmas cards and displayed on our mantel— for the same day? This will be great, I thought. We’ll already be in our best clothes, everyone’s hair will be done, and the setting will be gorgeous. It will be perfect. After the ceremony, there was a lovely luncheon with a colorful cupcake bar and bright red punch. My four kids ages 2, 4, 6, and 8 sprinted for the goodies and I spent a large portion of the luncheon chasing them around, wiping blue frosting off their faces and clothes—the only clothes I’d brought them for the family photo later. In all the shuffle, I lost track of Ezra, my youngest. Just then, I heard laughter coming from the direction of the punch cooler. I turned around and to my mortification, there was Ezra, drinking straight from the punch cooler, red punch coursing down his shirt! My hopes for the perfect family photo were dashed. {Photo by Cheyanne Schultz} Why Messes Don’t MatterLuckily, the wedding was held in my uncle’s back yard. I ran into their house and used some OxiClean™ MaxForce™ Spray to treat the red stain on Ezra’s shirt. After washing and drying it, the shirt came out good as new! I realized that messes don’t matter nearly as much as we think they do. For me, OxiClean™ MaxForce™ Spray takes the stress out of the mess and I love that. As you can see, there’s not even a trace of that red stain on Ezra’s shirt. I’m a complete believer in OxiClean™ MaxForce™ Spray. For my little family of six, perfect just doesn’t exist, especially when taking a family photo. Even now, we still have plenty of fails—see the attempts from this year’s photo shoot below: No one is ever looking at the camera at the same time. Someone’s got a goofy look on his or her face, and Ezra somehow found a rock to put in his mouth and a pine needle to stick in my ear. If we’re lucky, around 100 clicks into the photographer’s reel we’ll get a good one. With OxiClean™Max Force™ Spray, you don’t have to sweat the small stuff like imperfect photos or stains on clothes. I always keep a bottle of OxiClean™ Max Force™ Spray in my laundry room. With four active kids, I use it constantly and it gets the stain out every single time. As for Ezra and his stained wedding shirt…it wasn’t the first time and it definitely won’t be the last. Head to the OxiClean Website Savings page where you can score some great coupons! Behind the Scenes of the VideoWe had so much fun shooting this video. I hope you enjoy it! Here’s a little behind-the-scenes peek into the hours and hours that went into creating a 60-second clip of our lives. Our director Bill (above) was awesome! He flew in from New York City and it was his first time in Idaho. I think he wants to move here. A local production team came in and their equipment was everywhere! You wouldn’t believe how many lights, cameras, and thingamajigs are necessary for filming one video! For every single scene they had to move everything around. (And when they moved my couches, they found lots of snacks there.) No wonder these guys are pros. I got my own makeup artist whom I begged to move into my guest room.
We decorated cupcakes and the kids were even encouraged to make a mess. Believe me, they had no problem doing that. If you can’t tell, we’re big fans of OxiClean™ around here. OxiClean™ Max Force™ Spray can tackle even the bluest frosting and the reddest punch. Learn more about OxiClean™ Max Force™ Spray here! I hope you enjoy the video and a little glimpse into our very real and very messy life. Feel free to share on social media and remember that the messes can always be cleaned. Go out there and treat life like a punch cooler and drink straight from the spigot! Lots of love, Photography by Kara Jo Eaton The post The Day My Kid Became “That Kid” and Why Messes Don’t Matter appeared first on How Does She. by Nicolette via Home And Garden via Blogger The Day My Kid Became “That Kid” and Why Messes Don’t Matter |
Details
AuthorWrite something about yourself. No need to be fancy, just an overview. Archives
November 2020
Categories |